Wednesday, April 21, 2010

Sharepoint Designer 2010 More...

In today's blog post, I'd like to share the Introducing SharePoint Designer 2010 video and get your reaction to it.

The video gives a quick tour of the SharePoint Designer interface and then goes into the four main areas of customization in SharePoint Designer.
  1. Create data sources
  2. Create custom views and forms
  3. Create custom workflows
  4. Design and brand a site
Taken together, these are the tasks you perform to create custom no-code solutions on the SharePoint platform.

Introduction to SharePoint Designer 2010

SharePoint Designer 2010 is the premier tool to configure and customize SharePoint 2010. It has evolved from SharePoint Designer 2007 with a totally new look and feel to it. This video shows how you can navigate around the SPD 2010 environment.


Managing SharePoint Designer 2010

SharePoint Designer 2010 is a powerful application used to build custom sites and solutions on the SharePoint platform. It’s a great way to create and customize pages, views, forms, data sources, workflows, and more.

But there are some tasks in SharePoint Designer that give SharePoint administrators real heartburn because of the potential problems it creates for them.

Here are the big 3:

  1. Detaching pages from their site definition – When you do this, intentionally or not, the page overrides the site definition and therefore won’t be recognized the next time the site definition is updated. This means you’ll be talking to your SharePoint administrator the next time the server is upgraded.
  2. Customize master pages and page layouts – While this may improve the look and feel of your site, there’s a risk that you’ll remove the corporate brand that was intended for all sites in your organization. Even worse, you could potentially break your site and other sites if you change or delete a required content region.


  3. Editing files directly in the site URL structure – This might be a quick and easy way to modify any file on your site, but in doing so, you could mistakenly delete a support file or template file required by SharePoint.

So on one hand, SharePoint Designer 2010 gives you a lot of power and flexibility in how you change the appearance or functionality of a SharePoint site. But on the other, if it’s used incorrectly, it can create issues for you, your site, and of course, your administrator.

The SharePoint Designer Settings page

In SharePoint 2010, you and your administrator will be happy to learn about the SharePoint Designer Settings page, which looks like this.

SharePoint Designer Settings page

The SharePoint Designer Settings page helps you manage how SharePoint Designer 2010 is used in your organization by giving you control of these settings:

  1. Enable SharePoint Designer: Enables or disables SharePoint Designer for an entire application or site collection. When checked, SharePoint Designer can open and edit SharePoint sites. When unchecked, it cannot be used to open or edit sites.
  2. Enable Detaching Pages from the Site Definition: Enables or disables the ability to detach pages from the site definition. When checked, SharePoint Designer allows users to edit pages in Advanced Mode, giving them access to every part of the page and consequently when they save, the page is detached from its site definition. When unchecked, SharePoint Designer disables the Advanced Mode, forcing users to edit only the parts of the page in a Web Part Zone. The page, as a result, is never detached from the site definition.
  3. Enable Customizing Master Pages and Layout Pages – Enables or disables master pages and page layouts in SharePoint Designer. When checked, SharePoint Designer displays master pages and page layouts in the Navigation pane. When unchecked, these pages don’t appear in the Navigation pane of SharePoint Designer.
  4. Enable Managing of the Web Site URL Structure – Enables or disables the site URL structure and its contents. When checked, SharePoint Designer displays the All Files options in the Navigation pane allowing users to view and edit any file on the site. When unchecked, the All Files option doesn’t appear in the Navigation pane.

In Central Admin and Site Collection Admin

There are not one but two SharePoint Designer Settings pages that you can use to manage how SharePoint Designer 2010 is used in your organization:

  • Central Administration – The SharePoint Designer Settings page in Central Administration applies the settings at the web application-level for all site collection administrators on down. That’d be everyone.
  • Site Collection Administration – The SharePoint Designer Settings page in Site Collection Administration (you know, the Site Settings page for your top-level site) applies the settings at the site collection level to all designers and owners.

Use one or both pages to manage how SharePoint Designer 2010 is used in your organization without fear of it detaching pages, removing corporate brands, or breaking sites. You may even choose to temporarily enable and disable certain SharePoint Designer features depending on where you’re at with your SharePoint deployment.

What’s next?

Once you determine how SharePoint Designer should be used, your next step will likely be adding and removing users to and from the Designers and Owners groups. In SharePoint 2010, you can do this from the Site Settings page as well as in SharePoint Designer 2010!

Want to see it in action? Check out this video where I go over these same points, show you the SharePoint Designer Settings pages, and what things look like in SharePoint Designer when you enable and disable each setting.


Thursday, February 18, 2010

How to: Upload a file/document using the SharePoint Object Model

With this simple article, I'm walking you through the process of uploading any file to your Document Library.

Note; Since this is done through the local API, you need to have this code running on the server. That means that it's ideal to use in for example a FeatureReceiver or EventReceiver. You cannot run this code on the client in e.g. a Windows Form, then you'll need to utilize the SharePoint WebServices instead.

Code to upload a file/document to a SharePoint Document Library

Use the following code to get you started in uploading a file using the object model. It really isn't that hard :-)

// Getting a reference to the document library
var sp = new SPSite("http://localhost");
var site = sp.OpenWeb();
var folder = site.GetFolder("Documents");
var files = folder.Files;

// Opening a filestream
var fStream = File.OpenRead("C:\\MyDocument.docx");
var contents = new byte[fStream.Length];
fStream.Read(contents, 0, (int)fStream.Length);
fStream.Close();

// Adding any metadata needed
var documentMetadata = new Hashtable {{"Comments", "Hello World"}};

// Adding the file to the SPFileCollection
var currentFile =
files.Add("Documents/MyDocument.docx", contents, documentMetadata, true);

site.Dispose();
sp.Dispose();

As you can see in the image below, the metadata "Comments" has been filled in as per the metadata I specified in the code above.

File uploaded using the Object Model

Simple as that. Over and out!

Getting Started with the Business Data Catalog

In this article I will guide you through the very basics of getting started with Business Data Catalog, BDC:

  1. Install the AdventureWorks 2008 Sample Databases
    1. We will use this database as our example for retrieving data using the BDC.
  2. I will step you through the simple process of creating your ADF (Application Definition File)
    1. We will use this file as our import connection
  3. I will guide you through how we can import this ADF file and create our BDC Application
  4. Lastly, I will guide you through the process of creating a basic site and use some of the basic BDC Web Parts

Install the AdventureWorks sample database

  • You'll need to go and download the AdventureWorks sample databases
    image

  • Just finish the installation by clicking next a couple of times and let the installer do it's normal Microsoft-installer magic.
  • You should now see a couple of new databases in your SQL Server Management Studio:
    image
    AdventureWorks, AdventureWorks2008, AdventureWorksDW, AdventureWorksDW2008, AdventureWorksLT, AdventureWorksLT2008

Alright - We've got our databases, now we need to start thinking about how we will get data from our SQL server into SharePoint. This is done by creating/generating an Application Definition File (ADF) as you will see in the next section.

Creating the ADF (Application Definition File)

Alright, there's a few different options to create your ADF (Application Definition File). I will show you how to get started with using the free tool called "Application Definition Editor" that comes with the latest SharePoint Server SDK.

Note: See the bottom section in this article for a summary of links to all resources mentioned in the article.

After you have installed the latest SDK, you can choose to install the "Microsoft BDCTool" located here by default: "C:\Program Files\2007 Office System Developer Resources\Tools\BDC Definition Editor". Which will give you the following item in your Start Menu:
image

Launch the BDC Application Definition Designer

Click the application and launch the editor. You will see an interface like this:
image

Create or import your ADF file

There's basically two alternatives when it comes to editing an ADF (Application Definition File).
One is to create a new one (which I will guide you through first), and the other is to import an existing one (which I will show you after the first alternative).

Alt 1) Creating our own ADF file
Now we're going to connect to our newly created sample-databases and create an ADF file for use with those databases.
  • Click on ADD LOB System
  • Choose Connect To Database
  • You will see a nice popup-dialog where you will be able to enter the connection details to your desired database
    • Enter your connection details, example:
      image
  • You are presented with the "Designer Surface" that looks something like this:
    image
  • In our case, we're going to use the table called "vEmployee" which exist in the AdventureWorks database in order to pull out some information about our employees.
    • Search for the table called vEmployee and drag it out to the Design Surface
    • Search for the table called vEmployeeDepartments and drag it out to the Design Surface
    • It should look something like this:
      image
    • Make any necessary changes, then click OK
    • You'll see a view similar to this one after some tweaking:
      image
    • After you've done the necessary changes to your configuration, making sure it's a valid ADF with proper filters, enumerators and methods or whatever you need in your application then smile, because we're done with that part!
Alt 2) Importing an existing ADF file

If you don't want to do everything from scratch or you've already got an ADF file that you wish to modify, you can do so by importing an existing ADF file into the Definition Editor. Here's how:

  • Open the BDC Definition Editor tool, then click the "Import" button in the menu:
    image
  • Browse to your existing ADF file and choose to import it. Simple as that.
    (I am importing a file called BDCAWDW.xml, which contains definitions for Product, Reseller, ProductSubcategory, ProductCategory as shown below)
  • You'll see the imported ADF file's structure immediately in the designer, under the prerequisite that your SQL connection string in the ADF file is valid:
    image

Note: I will not detail how you create filters, finders, methods etc. in this article. You can read more about that here:
http://msdn.microsoft.com/en-us/library/ms145931(SQL.90).aspx

I may cover the topic of ADF-functionality in another article later on.

Generate the ADF file from the designer

I really don't need to tell you this, but there's a button called "Export" which you use to export the definition you've created using the definition editor to an xml file:
image

Import the ADF file

If we have gotten this far, we might as well get the last few bits in place.
What we now need to do is to import our ADF file into SharePoint, since that's where it should reside. Follow along with these few simple steps to make sure you're properly importing your file into SharePoint.

  • Navigate to your Shared Services Provider Administration site (You can access your SSP through Central Administration)
  • You are presented with a section called "Business Data Catalog" where you'll find a bunch of different alternatives.
  • Make sure you have the permissions to modify the BDC (See the link Business Data Catalog permissions)
  • Click "Import application definition"
    image
  • Browse for your .xml file and click "OK":
    image
  • You'll see a progress bar (You don't see that a lot in SharePoint. I love it!), telling your how the import process is going:
    image
  • When it's done, you'll click "OK" and be presented with an overview of your imported BDC Application:
    image
Configure permissions on the BDC Application Definition

In order for all users to be able to select/read data from your BDC Application, you'll need to make sure they've got the appropriate permissions to actually do so.

Usually I do this setting on each of the imported entities, in case you want specific permissions on different entities - instead of on the entire application.

  • Select the DropDown list on your first entity and choose "Manage Permissions":
    image
  • Choose "Add Users/Group":
    image
  • Enter "NT AUTHORITY\AUTHENTICATED USERS" and choose "Select in Clients":
    image
  • Repeat these steps for the other entity as well.
  • You're done.

Now we have created or imported an ADF file with the Business Data Catalog Definition Editor tool, exported it to an .xml file, imported it into SharePoint, set basic permissions on the entities.

Next, we should make sure that the application works in SharePoint by adding a Business Data Catalog-WebPart to a page.

Use the basic built-in BDC Web Parts

Awesome. Now that we have gotten this far by importing an ADF file into SharePoint and set appropriate permissions on the entities - We're ready to actually use the ADF connection to view stuff in our database.

Note: I have created a new blank site where I can easily show the built-in BDC Web Parts - so that's where I am adding my Web Parts.

  • Add two Web Parts to your page called "Business Data List" and "Business Data Item":
    (Note that when you've configured a BDC application, you'll see the Business Data web parts)
    image
  • Choose to edit the properties of the Business Data List Web Part:
    image
  • Click the Browse-icon to the right to pop up the BDC entity chooser:
    image
  • It will present you with the following interface (note, BDC applications will of course vary depending on what you have imported..):
    image
  • Double click the "Employee" type, and then click "OK" in your Web Part property window.
  • Repeat this process for the "Business Data Item" Web Part, and select "Employee" in the BDC Type Picker as well.

Now we've got one BDC List Web Part which will list all employees, and one BDC Item Web Part that will display details about the employee we select.

In order for this to work we must connect the two Web Parts.

  • Edit menu of your Web Part -> Connections -> Send Selected item To -> Employee
    image

Test our BDC Application out, and make sure it works!

  • Choose "LastName" then "contains" and enter "smith":
    image
  • Select one of the results by clicking the radiobutton to the left, and see that the result (details) about the Employee shows up in the connected Web Part:
    image

Resources and links

Summary

This article is a basic step-by-step guide to getting started with BDC in MOSS 2007. I've shown you every step from creating the databases required (in our case some sample databases) to creating the ADF file and to finally utilize the BDC connection from a site, using the BDC Web Parts.

Monday, February 1, 2010

SharePoint 2010 New Features

Microsoft has released a couple of sneak peek videos about SharePoint 2010 at http://www.microsoft.com/sharepoint

Here are some of my notes from these videos

Business Value

The SharePoint pie from MOSS 2007 has been changed for 2010. Instead of focusing on generic portal topics, the focus is more on the business value of SharePoint. Here is the new pie

New%202010%20Pie

Sites

Sites are all about sharing info with employees/partners/customers – empowering customers across all mediums
Team Sites, Internet Facing sites, extranets for customers and partners

Communities

Ad-Hoc Communities
Communities in terms of hierarchy (comes from AD)
Communities now include Business Partners. You could search for users who are non-employees

Content

Collaboration Content
Line of Business Content
People Centric Content

Search

FAST Search is integrated into SharePoint
Highly scalable Search engine
Emphasis on getting the right results on the first page
Enhanced People Search
Enhanced Business Data Search

Insights

Combination of all the above
Microsoft’s vision is a decision engine that brings other tools into unison

Composites

Help rapidly create dynamic business solutions
End user applications
Business Processes
Tools and integration with SharePoint Designer, Visual Studio

New Features

  1. Ribbon inside SharePoint
  2. Customizable Ribbon
  3. Contextual
  4. Removable and users have the option to go back to the MOSS 2007 interface
  5. Asynchronous user interface – minimal postbacks
  6. Dialogs employ DHTML effects to gray the background and provide user dialogs

Functionality previously available under the Content and Structure pages are now available in the main library

Multi select documents to checkout /check -in/delete etc.


Customization Capabilities

  1. Page edits are called Web-Edits – This replaces the Site Text and font etc.
  2. Live Preview of fonts/colors etc, similar to Office 2007
  3. Upload and modify Images directly instead of uploading first to a image library
  4. Picture Tools provide Resizing of pictures directly using the picture
  5. Changing styles like having borders etc. for images

SilverLight

  1. Add SilverLight web parts without additional configuration
  2. Just point the web part to a XAP file in a document library
    Interactive zoom is available on SilverLight web parts

Theming

  1. You can theme SharePoint using the same theme as PowerPoint
  2. e.g Upload a Powerpoint theme
    Choose the theme and apply it to the site
    Now the site looks like the Powerpoint slide
    You can preview a theme on the site before applying it
  3. Firefox is fully supported and can do the same things as IE
  4. Completely redesigned Sharepoint Designer with Ribbon

Visio Services

  1. Visio can connect to backend and visualize the data
  2. Can publish visio into SharePoint and can render them without the need for visio on the client (similar to Excel Services)
  3. This functionality is called Visio Services
  4. Can zoom in and zoom out of diagrams
  5. Needs a good Visio design first for Business processes

BDC is now Business Connectivity Services

  1. Can take LOB data offline using SharePoint workspace Manager(previously Groove)
  2. Tools in SPD and VS for modeling LOB entities
  3. External data are called Entities – they live in BCS and you can work with them in SPD
  4. External Content types based on these LOB entities can be created within SPD
  5. There is a browser within SPD which can browse SQL Databases and provide views/stored procs etc.
  6. You can right click on an entity and create CRUD operations on it using a simple wizard and publish from SPD
  7. External data gets converted to a list like view
  8. Users can filter and sort BCS data and work with it like they would with a SharePoint list
  9. Users can seamlessly update data in 2010, which will automatically update the LOB system
  10. You can create a Word template with BDC elements and publish to a library. When the user creates a new document they can pick those BCS entities within Office
  11. To take items offline use Groove – SharePoint workspace manager – Click on Sync to Computer
  12. Lists/Libraries are all synced
  13. LOB data flows offline in Groove
  14. Can edit LOB data when offline and sync back when connected

Whats New for Developers

  1. Visual Studio 2010 has Visual Web part Designer. No more building tables for layout. You can drag and drop and create controls within web parts, similar to ASP.NET forms
  2. Developer Dashboard – can allow any page to provide debug info
  3. LINQ for SharePoint has been released and allows developers to use LINQ objects to query SharePoint lists
  4. Client Object Model – can run code on the client using JS/.NET. This is especially useful when building Silverlight applications
  5. Supports TFS , automated builds
  6. New Project Templates are available in Visual Studio 2010
  7. Comes with a SharePoint Server Explorer within VS
  8. Can lookup Sites/Lists etc. as just like SQL Explorer in visual studio
  9. Can automate post deployment tasks – no more post deploy batch files required, UI to specify deployment steps
  10. There is a BDC explorer within VS to explore LOB data from within VS
  11. Visual Web part project comes with Features and Packages automatically. Complete drag and drop functionality to visually build a web part
  12. SilverLight can use Client Object Model to access list data using Microsoft.SharePoint.Client namespace
  13. Runs CAML queries asynch and provides a rich client side object model to access data

Whats New for Administrators

  1. New SharePoint best practices analyzer – Comes with a set of pre-built rules , You can build your own rule if you need. It can automatically correct issues provided you set it up to do so
  2. New Central Admin Console look and feel. Items are grouped differently compared to the 2007 version
  3. New Backup and Restore Tools in the UI
  4. Visual Upgrade option – Can upgrade 2007 to 2010 and keep the old layout and customizations
  5. New SQL Logging Database – Developers can write code to log to this SQL database , Can write your own events into the logging database, Whole bunch of out of the box reports for logging
  6. Scalable List infrastructure - Can control how many items get returned from a list , Can set happy hour deadlines to filter the number of items in a list based on time of day
  7. Unattached Content DB recovery – If you need to recover sites/lists from a DB backup you can do so without restoring it onto a temporary site. You can also – Browse content, Backup the site , Export site and all of this without restoring it onto a site
  8. Upgrade looks and feels like 2007 – Can preview the new look and feel and revert back to the old version

Monday, January 11, 2010

InfoPath FormViewer Webpart

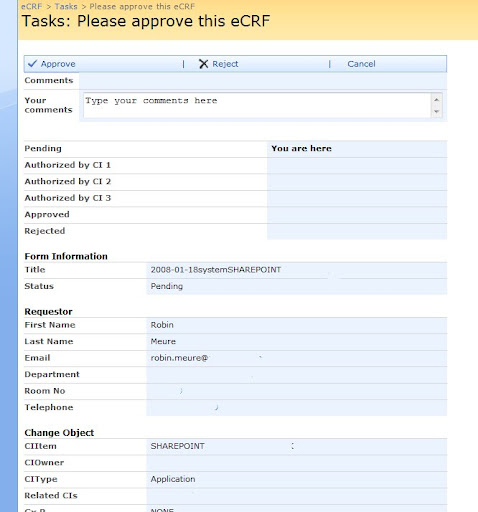
It's been a while since I last posted and there is a very good reason for it! I will save the reason for another post in the very near future but right now I wanted to share this webpart I've been working on. As the title suggests it's a webpart that views the content of an InfoPath form. Now it's not a webpart that just renders the xsn file (like the FormViewer webpart). No, what it does is displaying all the promoted columns of a particular submitted form.

The big question is ofcourse.. "Robin.. why on earth did you build this" Well it has something to do with posts I made in the past ((Approval) Workflow thingies continued & (Approval) workflow thingies) where I copied information from the promoted columns of the form into a tasklistitem. By doing this, an user can easily see what he/she needs to approve in just one or two click(s). Now I was getting tired to copy every promoted column by hand in SPD for each Action I created per step. So I decided to build a webpart which did the following :

  • Show the promoted columns without specifying them per form
  • Show headers to group columns
  • Have the ability to Approve or Reject the form
  • (optionally) show the approver which phase of the workflow status he/she is approving

Now within defining the workflow in SPD, the only thing I need to copy each time into a new taskitem is the ID of the form and the person who must approve that step. The webpart takes care of the rest by using that information. How? Well you drag the webpart onto the 'editform.aspx' page of the task list. Using this page, it will give me the ID of the task (querystring in the URL) and by having both ID's (task and form) I can display and update the information.

Now a screenshot tells you more than a lot of words so here's what it looks like:

Pretty impresive eh? (I know I need to fix the layout;) .. Now the only input this webpart needs is the following :

  • FormLibraryName, the name of the library where the information should be fetched from
  • Name of a view, this view is being used to show the columns that you want to have in the webpart.
  • TaskName, the name of the tasklist where the tasks are created for the workflow
  • Headers, a comma separated string where you can specify where headers should be placed and what the title should be.

So how does the code look like? Well.. it's quite big so I will only post the relevant stuff.

  • Hiding the default EditForm formfield
  • writer.Write("");
  • Getting the reference of the taskitem and the formitem
  • SPWeb web = SPControl.GetContextWeb(Context); SPList tasklist = web.Lists[_tasklist]; SPListItem taskitem = tasklist.GetItemById(Convert.ToInt32(Page.Request.QueryString["ID"])); SPList formlist = web.Lists[_formlibrary]; SPListItem formitem = formlist.GetItemById(Convert.ToInt32(taskitem["ListItemID"].ToString()));
  • Displaying the status of the workflow by using a column named "Status" in the formlibrary
  • SPFieldChoice status = (SPFieldChoice)formlist.Fields["Status"]; writer.Write(""); foreach (string _status in status.Choices) { if (_status == formitem["Status"].ToString()) { writer.Write(""); } else { writer.Write(""); } } writer.Write("
    "); writer.Write(_status.ToString()); writer.Write(""); writer.Write("You are here"); writer.Write("
    "); writer.Write(_status.ToString()); writer.Write(""); writer.Write(" "); writer.Write("
    ");
  • Displaying all the columns based on a view. And when given, display a header
  • //Render the columns with their values based on the view that is selected writer.Write(""); SPView view = formlist.Views[_view]; System.Collections.Specialized.StringCollection strCollection = view.ViewFields.ToStringCollection(); for (int i = 0; i < splitter =" {" seperator =" _separators.Split(splitter);" x =" 0;" _splitter =" {" colom =" seperator[x].Split(_splitter);" y =" 0;" i ="=">"); } break; } } } finally { //Write all the columns that are in the view with their values writer.Write(""); writer.Write(""); } } catch (Exception error) { writer.Write(error.Message.ToString()); } } writer.Write("
    " + colom[1] + "
    "); if (formitem.Fields.GetFieldByInternalName(strCollection[i]).Title != null) { //ColumnName writer.Write(formitem.Fields.GetFieldByInternalName(strCollection[i]).Title); } writer.Write(""); if (formitem[(strCollection[i])] != null) { //ColumnValue writer.Write(formitem[(strCollection[i])].ToString()); } writer.Write("
    ");