Monday, January 11, 2010

InfoPath FormViewer Webpart

It's been a while since I last posted and there is a very good reason for it! I will save the reason for another post in the very near future but right now I wanted to share this webpart I've been working on. As the title suggests it's a webpart that views the content of an InfoPath form. Now it's not a webpart that just renders the xsn file (like the FormViewer webpart). No, what it does is displaying all the promoted columns of a particular submitted form.

The big question is ofcourse.. "Robin.. why on earth did you build this" Well it has something to do with posts I made in the past ((Approval) Workflow thingies continued & (Approval) workflow thingies) where I copied information from the promoted columns of the form into a tasklistitem. By doing this, an user can easily see what he/she needs to approve in just one or two click(s). Now I was getting tired to copy every promoted column by hand in SPD for each Action I created per step. So I decided to build a webpart which did the following :

  • Show the promoted columns without specifying them per form
  • Show headers to group columns
  • Have the ability to Approve or Reject the form
  • (optionally) show the approver which phase of the workflow status he/she is approving

Now within defining the workflow in SPD, the only thing I need to copy each time into a new taskitem is the ID of the form and the person who must approve that step. The webpart takes care of the rest by using that information. How? Well you drag the webpart onto the 'editform.aspx' page of the task list. Using this page, it will give me the ID of the task (querystring in the URL) and by having both ID's (task and form) I can display and update the information.

Now a screenshot tells you more than a lot of words so here's what it looks like:
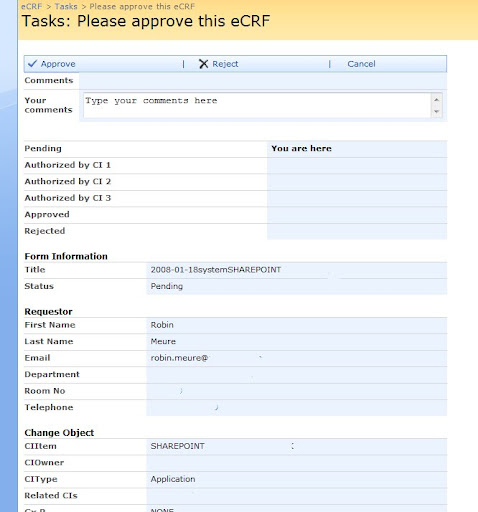
Pretty impresive eh? (I know I need to fix the layout;) .. Now the only input this webpart needs is the following :

  • FormLibraryName, the name of the library where the information should be fetched from
  • Name of a view, this view is being used to show the columns that you want to have in the webpart.
  • TaskName, the name of the tasklist where the tasks are created for the workflow
  • Headers, a comma separated string where you can specify where headers should be placed and what the title should be.

So how does the code look like? Well.. it's quite big so I will only post the relevant stuff.

  • Hiding the default EditForm formfield
  • writer.Write("");
  • Getting the reference of the taskitem and the formitem
  • SPWeb web = SPControl.GetContextWeb(Context); SPList tasklist = web.Lists[_tasklist]; SPListItem taskitem = tasklist.GetItemById(Convert.ToInt32(Page.Request.QueryString["ID"])); SPList formlist = web.Lists[_formlibrary]; SPListItem formitem = formlist.GetItemById(Convert.ToInt32(taskitem["ListItemID"].ToString()));
  • Displaying the status of the workflow by using a column named "Status" in the formlibrary
  • SPFieldChoice status = (SPFieldChoice)formlist.Fields["Status"]; writer.Write(""); foreach (string _status in status.Choices) { if (_status == formitem["Status"].ToString()) { writer.Write(""); } else { writer.Write(""); } } writer.Write("
    "); writer.Write(_status.ToString()); writer.Write(""); writer.Write("You are here"); writer.Write("
    "); writer.Write(_status.ToString()); writer.Write(""); writer.Write(" "); writer.Write("
    ");
  • Displaying all the columns based on a view. And when given, display a header
  • //Render the columns with their values based on the view that is selected writer.Write(""); SPView view = formlist.Views[_view]; System.Collections.Specialized.StringCollection strCollection = view.ViewFields.ToStringCollection(); for (int i = 0; i < splitter =" {" seperator =" _separators.Split(splitter);" x =" 0;" _splitter =" {" colom =" seperator[x].Split(_splitter);" y =" 0;" i ="=">"); } break; } } } finally { //Write all the columns that are in the view with their values writer.Write(""); writer.Write(""); } } catch (Exception error) { writer.Write(error.Message.ToString()); } } writer.Write("
    " + colom[1] + "
    "); if (formitem.Fields.GetFieldByInternalName(strCollection[i]).Title != null) { //ColumnName writer.Write(formitem.Fields.GetFieldByInternalName(strCollection[i]).Title); } writer.Write(""); if (formitem[(strCollection[i])] != null) { //ColumnValue writer.Write(formitem[(strCollection[i])].ToString()); } writer.Write("
    ");

Tuesday, December 22, 2009

jQuery in SharePoint Example - Rounded Corners

A recent project involved the branding of MOSS to incorporate custom design elements as supplied in a PhotoShop page mockup. One of these design requirements was rounding the external corners of the quick launch menu.

Hmmm, what to do. There are plenty of techniques discussed on the web for achieving this outcome, but often the basis for these techniques is to start with clean, web-standards compliant HTML. That's certainly not what SharePoint provides - I needed to work with the HTML that is created by the mixture of master pages and user controls, and did not want to override standard elements for this styling exercise. One aim was to minimize the changes, if any, to the master page.

Many of the rounded corner approaches use JavaScript. And I was, at the time of this project, starting to see the potential of jQuery combined with SharePoint. So a little more research located a neat way forward - the jQuery.Round plug-in.

After a few minutes (hours?) experimentation I derived the jQuery statements to apply rounded corners to the menu. This of course also required adding references to the jQuery and jQuery.round libraries in the master page - so it was necessary after all to change that page!

The statements were:

function AddQuickLaunchCorners()
{
    $(".ms-quicklaunchouter").corner("10px");
    $("div.ms-quickLaunch h3.ms-standardheader span div.ms-quicklaunchheader").css("background-color", "#c1ecff").corner("top 7px");
    $("table.ms-recyclebin:last td").corner("bottom 7px");
}

Note the assumption in the last JavaScript statement that the recycle bin will be the bottom row in the quick launch menu.

These statements, together with modifications to some of the other CSS styles, resulted in the following look for the quick launch menu:


But then I came across a very annoying behaviour. Imagine the following scenario:

  • I view a page containing this menu in one tab in IE7
  • Then I open another tab in IE7 and navigate around any page in that second tab

Not an unusual behaviour really. But on returning to the first tab displaying the SharePoint page with menu, this is what the menu then looked like:


Yeuch! More "minutes" of investigation lead to the inclusion of the following code in the JavaScript file applying the dynamic styling to the page:

window.onfocus = ReapplyQuickLaunchCorners;

function ReapplyQuickLaunchCorners()
{
    RemoveQuickLaunchCorners();
    AddQuickLaunchCorners();
}

function RemoveQuickLaunchCorners()
{
    $("div.ms-quicklaunchouter>div:not(.ms-quickLaunch)").remove();
    $("div.ms-quickLaunch h3.ms-standardheader span div.ms-quicklaunchheader>div").remove();
    $("table.ms-recyclebin:last td>div").remove();
}

Not a nice solution (OK, it's a hack!) but it works and I ran out of time.

So where am I leading with this post - well, just to illustrate the great things you can do with jQuery to mould SharePoint. Sometime I'll blog about using jQuery for AJAX calls to the MOSS profile search web services, but that's for another time.....


Sunday, December 20, 2009

Renaming a stand-alone SharePoint 2010 server

Have you gotten around to trying out the SharePoint 2010 public beta yet?

In an effort to provide everyone that would want one access to a virtual machine with SharePoint 2010 Beta, Visual Studio 2010 Beta and SharePoint Designer 2010 Beta, I decided to create such VM and put it up on a file share so that anyone can grab a copy and get going and thought I’d blog about how I did it.

I decided to use Windows 7 on the image, just to prove that it works. Now, SharePoint 2010 requires a 64-bit OS, which means that Virtual PC is out unfortunately. But VirtualBox and VMWare Player are both excellent and free. Personally, I created the image using Virtual Box, and then exported a copy in VMWare format so that our developers could choose whichever VM solution they preferred.

Unfortunately, it wasn’t as easy as just running the SharePoint 2010 installation as you would on server OS. As described in this article, you need to extract the setup files and modify a configuration file to allow the installer to run on Windows 7. Another caveat I came across was that the SharePoint Products and Technologies Configuration Wizard would fail on step 8, “creating sample data”, with an error message about “Unrecognized attribute ‘allowInsecureTransport’”. But installing the hotfixKB976462, I could finally run the wizard successfully.

The last thing I had to figure out was the easiest way of renaming the VM after cloning it to avoid name collisions on the network. I found this guide for SharePoint 2007, and it still works, but since SharePoint 2010 includes the PowerShell based Management Shell, I performed some of the steps using it instead.

Here are the steps I took:

  1. Start the management shell
  2. Run “Rename-SPServer -Identity -Name
  3. Change the name of the server (in the computer properties dialog)
  4. Reboot
  5. Start the management shell again
  6. Run “Set-SPAlternateURL -Identity -Url
  7. Run “Set-SPAlternateURL -Identity -Url
  8. And you’re good to go! :)

If you run in to access denied errors, try running the management shell as administrator.

Knowing just how lazy we developers are, I created a PowerShell script that performed the entire name change after prompting the user for the new server name and the central administration port and put the script on the desktop on the original VM image. That way, the developer just has to run the script after booting a newly cloned image. Clean and easy. :)

Here’s the source for the PowerShell script:

Echo "Loading SharePoint extensions..." $ver = $host | select version if ($ver.Version.Major -gt 1)  {$Host.Runspace.ThreadOptions = "ReuseThread"} Add-PsSnapin Microsoft.SharePoint.PowerShell  $newSrvName = Read-Host -Prompt "Enter new server name" $caport = Read-Host -Prompt "Enter Central Administration port"  echo "Renaming server..." $ComputerInfo = Get-WmiObject -Class Win32_ComputerSystem $oldSrvName = $ComputerInfo.Name $ComputerInfo.Rename($newSrvName)  echo "Updating alternate access mappings..."  Set-SPAlternateURL -Identity "http://$oldSrvName`:$caport" -Url "http://$newSrvName`:$caport" Set-SPAlternateURL -Identity "http://$oldSrvName" -Url "http://$newSrvName"  echo "Renaming server in SharePoint configuration..." Rename-SPServer -Identity "$oldSrvName" -Name "$newSrvName"  echo "Done! RESTART the server for the changes to take effect" $restart = Read-Host -Prompt "Restart now? [Y/N]" if ($restart -eq "Y") {  shutdown -r -t 10 -f -c "Restarting server after name change" }

Thursday, December 3, 2009

SharePoint Workflow Authoring in Visio Premium 2010

Visio has long been the tool of choice for documenting processes. Ever since the introduction of workflow support in Microsoft Office SharePoint Server 2007, we have been hearing from customers, “wouldn’t it be great to visualize SharePoint workflows in Visio like flowcharts? Wouldn’t it also be great to go from Visio business process diagrams to executable workflows on SharePoint?”

In Visio Premium 2010, we have partnered with the SharePoint Designer team to bring you that functionality to life. In this blog post and the next, we will introduce to you how you can author SharePoint workflows just like any flowcharts in Visio, and how such workflows can then be imported into SharePoint Designer 2010 for further editing before it can be executed in SharePoint.

What are SharePoint Workflows?

First of all, what are SharePoint Workflows? Workflow is just another way of saying process flow, something most Visio users are already familiar with. In SharePoint, there are pre-defined common activities (e.g. Send email) that can be executed together with others, and together this forms a “workflow”. Some SharePoint workflow examples include: document approval workflow, expense approval workflow, and document review feedback workflow. A user may originally create the business workflow in Visio, as shown below:


That same workflow, implemented as a SharePoint Workflow, can look like the following in SharePoint Designer 2010:


So how can you go from a business flowchart in Visio to a workflow published to SharePoint?

Starting from Visio: New SharePoint Workflow Template

In Visio Premium 2010, we are introducing a brand new drawing template just for SharePoint Workflow. When you start up Visio, you can go to New->Flowchart->Microsoft SharePoint Workflow in order to start authoring a Visio SharePoint Workflow from scratch.

This is especially handy for Business Analysts or
Process Analysts who are already familiar with flowcharting in Visio, but would like to automate the workflow to be executed in SharePoint.

Upon opening the drawing, you will notice that key SharePoint activities are available in three separate stencils: SharePoint Workflow Actions, SharePoint Workflow Conditions, and SharePoint Workflow Terminators. Every SharePoint activity directly maps to those available in SharePoint Designer 2010.


To start authoring a SharePoint workflow, simply drop shapes to the drawing canvas, just like creating any basic flowchart in Visio. Note you can modify the original shape text and replace it with text more relevant to your business process:


Exporting Workflow to SharePoint Designer 2010

When you are done with authoring your workflow, you can export it in a file that can be imported by SharePoint Designer 2010. By exporting the workflow to SharePoint Designer 2010, SharePoint specialists or IT professionals alike can further parameterize the workflows by binding workflow activity fields with SharePoint lookups and then publish as executable workflows.

To export, simply go to the Process tab, and click Export:

Visio will automatically validate the workflow first to make sure the workflow is valid (for more information about our validation feature, see this earlier blog post). In the event that your workflow has issues, an Issues window will pop up, and the shape with the issue will be highlighted.

After you fix all issues, the workflow will be exported as a Visio Workflow Interchange (*.vwi) file, which can be imported into SharePoint Designer 2010.

Upcoming Post: Part 2 of SharePoint Workflow Authoring in Visio Premium 2010

Tuesday, December 1, 2009

How to build the Silverlight web part?

Steps to create this on your own site using SharePoint Designer (no server access or web part installation required).

Note: Copy any code below into notepad first. Only PNG and JPG are supported by Silverlight 1.0.

Assuming you have a SharePoint picture library already created.

  1. Create a Document Library to hold your web part page and the required SilverLight files (set template to Web Part Page)
  2. Create a folder called script in the document library
  3. Copy the following files from http://www.codeplex.com/bjsspv/Release/ProjectReleases.aspx?ReleaseId=6444 into the script folder
    1. Createsilverlight.js
    2. Main.js
    3. Silverlight.js
    4. Scene.xaml
    5. Photoitem.xaml
  4. Create a Web Part Page in the library
  5. Edit the web part page in SharePoint Designer
  6. Insert a Data View of your picture Library (just select one field from the data source view)
  7. Set the data view layout to Plain Layout
  8. Add the following code immediately before the tag in the


    Loading...]]>

  9. Replace the dvt_1 template with the following


    PlnTitl

]]>

  • Replace all the code between the with

    localScene.PhotoItemsUrls[''] = new BinaryJamSFSPartPhotoUrls('http://www.wssdemo.com','http://www.wssdemo.com/today/_t/_.jpg');

    This adds the image url and calculates the thumbnail for the image (_ext.jpg). Substitute www.wssdemo.com with your site url and Today with your picture library. Important: If your picture library is in a sub site, the first URL should be to your root site collection, not the sub site.

  • Save your page and view it in the browser (mouse over the bottom of the image to get the selector to display)
  • Sunday, November 1, 2009

    Solve SharePoint Performance Problems in SQL Server

    Most poorly performing SharePoint sites are caused by underlying SQL server configuration, or lack there off, settings.
    One of the big impacts of using SharePoint Central Admin to create content databases is that they will be based on the Model DB template.
    This results in the following:
    Data File = 10Mb with auto grow = 1Mb
    Log File = 1Mg with auto grow = 10%
    This means that almost every time a user saves an office document, SQL will have to "auto grow" the database files and there is an overhead to this operation. The SQL Disk Usage report will give you an indication of this impact on existing content databases that started with the default size.


    This is a relatively small content database but has already been extended many hundreds of times with 45ms per second in this case.
    Extending the Database (data and log files) manually to a size that would provide for 6/12 months projected storage requirements results in a noticeable improvement in end user response times not only for saving documents but in overall responsiveness of all sites in the database.
    There is much more to designing a good SQL platform for SharePoint, this is just some evidence in case you didn't believe it...

    New SharePoint 2010 content for download

    SharePoint 2010: Developer Platform White Paper

    This white paper provides an overview of the SharePoint 2010 Developer Platform for ASP.NET developers.

    SharePoint 2010: SharePoint Developer Platform Wall Poster

    The SharePoint 2010 Developer Platform wall poster (PDF format) shows a view of the SharePoint 2010 developer tools, community ecosystem, execution environment, Sharepoint Server 2010 workloads, and target application types. The poster is intended to be printed at 24 inches x 36 inches (61 centimeters x 91 centimeters).

    SharePoint 2010: Getting Started with Development on SharePoint 2010: Hands on Labs in C# and Visual Basic

    Use these 10 hands-on lab manuals for SharePoint 2010 to get started learning SharePoint 2010 development.

    SharePoint 2010: Developer and IT Professional Learning This document provides information to help developers and IT professionals learn Microsoft SharePoint 2010.

    SharePoint 2010: Professional Developer Evaluation Guide and Walkthroughs

    The SharePoint 2010 developer evaluation guide describes the SharePoint 2010 developer platform, including walkthroughs of some of the new capabilities for developers.

    Enterprise Search Planning for SharePoint Server 2010

    This model describes primary architecture design decisions for search environments.

    Design Search for SharePoint Server This model describes the steps to determine a basic design for a SharePoint Server 2010 search architecture.

    SharePoint Server 2010 Search Architecture


    This model describes the physical and logical architecture components of the search system.

    Getting started with BI in SharePoint Server 2010

    Discusses the business intelligence tools available in SharePoint Server 2010

    SharePoint Server 2010 Evaluation Guide

    Introduction and overview of SharePoint Server 2010 for IT pros.

    SharePoint Enterprise Search

    Compares and contrasts search technologies in SharePoint 2010 Products

    Topologies for SharePoint Server 2010

    Describes common ways to build and scale farm topologies, including planning which servers to start services on.

    Hosting Environments for SharePoint 2010 Products

    Summarizes the support for hosting environments and illustrates common hosting architectures.

    Services in SharePoint Products 2010


    Describes and illustrates the services architecture, including and common ways to deploy services in your overall solution design.

    Cross-farm Services in SharePoint 2010 Products

    Illustrates how to deploy services across farms to provide centralized administration of services.

    Business Connectivity Services poster

    Microsoft Business Connectivity Services enable users to interact with external data by using SharePoint lists and Microsoft Office 2010.

    Upgrade planning poster

    Describes requirements and considerations for planning to upgrade to SharePoint Server 2010

    Upgrading services poster

    You need to give special consideration to the issues involved when you upgrade services from the previous version of SharePoint Server.

    Upgrade testing poster

    To help ensure a smooth transition to SharePoint Server 2010, perform a trial upgrade to find issues likely to surface during the actual process.

    Upgrade approaches poster This model describes the three basic approaches to upgrading to SharePoint Server 2010: in-place, database attach, or a hybrid of the two.

    Forefront Protection 2010 for SharePoint Beta 2 Microsoft Forefront Protection 2010 for SharePoint prevents users from uploading or downloading documents containing malware, out-policy content, or sensitive information to SharePoint libraries.

    Microsoft Forefront Server Security 2010 Privacy Statement This document describes the privacy policy for Microsoft Forefront Security 2010 for Exchange and Microsoft Forefront Security 2010 for SharePoint.

    Microsoft Online Services 2010 CTP Help Microsoft Online Services 2010 CTP Help is a small set of documents that provide basic "Get Started" information for the July 2009 Community Technology Preview of Microsoft Online Services 2010.

    SharePoint Products and Technologies: 2010 (Technical Preview) Developer Documentation This download provides an early technical preview of the SharePoint Products and Technologies: 2010 developer documentation.